Screwdrivers, Hammers, Pliers, and Better
Mouse Traps
John McCabe
What follows is an overview of a few ordinary hand tools used
by some folks to open oysters as well as a closer look at some
related professional and kitchen ware tools. Tools that are pulled
right out of one's tool box are entirely out of place when processing
food - particularly when preparing a delicacy like oysters. Besides
tools, a tool box frequently harbors residue from motor oil,
grease, rust, paint chips, tiny metal fragments, and lots of
other "incidental stuff".
* Screwdrivers
A flat-head screwdriver is likely the most common conventional
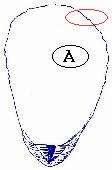
tool used to open oysters. It does work. Both the classic
method (entry via the hinge) and the clever
chipping method will quickly open the oyster. I used a skinny
flathead screwdriver for years. One fine day I skewered my left
hand with it. I choose to reflect back on that annoying week
during which my left hand was out of commission as a time of
enlightenment. I "brilliantly" deducted that the "screw"
part in the word "screwdriver" actually has something
to do with screws - not oysters. Ironically, up to that point,
I had always been the one to preach "Performing a good
job presupposes using the right tools." I then went
out and bought a good quality oyster knife - and later wondered
how I ever got along without it.
* Hammers
Besides the proverbial "when all else fails..." carpentry
claw hammer, there are several other types of hammers that are
certainly noteworthy in the context of oysters. All of them have
one thing in common: They are used for cracking and chipping,
never smashing!
Conventional (Claw) Hammer
In terms of opening oysters, the conventional carpentry claw
hammer is probably still the most commonly used hammer style.
This phenomenon may, at least in part, be due to what some might
have interpreted as a form of governmental endorsement of this
crude instrument as an "oyster tool" ("... a
method preferred by some cooks"). In 1964, the U.S.
Bureau of Commercial Fisheries issued a booklet on oysters. It
had been reissued numerous times since 1953 and was part of a
series of booklets on the preparation of fish and shellfish.
All of the booklets were  exceptionally well done. In the oyster booklet,
the use of a conventional carpentry hammer was shown for "billing"
the oyster (inset picture) and the subsequent use of an oyster
knife was advised to cut the adductor muscle inside. The clumsy
hammer is entirely superfluous (and one more tool to clean),
as a quality oyster knife will perform both tasks just fine (as
described in the clever
method).
exceptionally well done. In the oyster booklet,
the use of a conventional carpentry hammer was shown for "billing"
the oyster (inset picture) and the subsequent use of an oyster
knife was advised to cut the adductor muscle inside. The clumsy
hammer is entirely superfluous (and one more tool to clean),
as a quality oyster knife will perform both tasks just fine (as
described in the clever
method).
 If, for some
reason, the use of this hammer type is deemed indispensable,
perhaps a small ball-peen hammer (instead of a claw hammer) might
be considered instead. The head of the hammer should be unpainted.
It should then be dedicated solely to food preparation purposes
and never end up out in the tool box. The face of the hammer
(not the ball end) is used. It may also come in handy for other
types of shellfish (like crab).
If, for some
reason, the use of this hammer type is deemed indispensable,
perhaps a small ball-peen hammer (instead of a claw hammer) might
be considered instead. The head of the hammer should be unpainted.
It should then be dedicated solely to food preparation purposes
and never end up out in the tool box. The face of the hammer
(not the ball end) is used. It may also come in handy for other
types of shellfish (like crab).
 A so called cross-peen hammer is even better. It has
a horizontal straight edge (instead of the ball) on one side.
Both the face and the edge side may thus prove useful in the
kitchen.
A so called cross-peen hammer is even better. It has
a horizontal straight edge (instead of the ball) on one side.
Both the face and the edge side may thus prove useful in the
kitchen.
 The so
called straight-peen hammer can also serve nicely in the kitchen,
not only as a crab or oyster helper, but also with tasks such
as breaking tough bone ligaments on meats. Unlike the cross-peen
hammer, the straight-peen hammer has a dull hatchet like edge
which runs in line with the handle. After use, hammers should
be washed and oiled with a little vegetable oil to help prevent
rust.
The so
called straight-peen hammer can also serve nicely in the kitchen,
not only as a crab or oyster helper, but also with tasks such
as breaking tough bone ligaments on meats. Unlike the cross-peen
hammer, the straight-peen hammer has a dull hatchet like edge
which runs in line with the handle. After use, hammers should
be washed and oiled with a little vegetable oil to help prevent
rust.
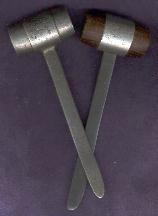 Crab Hammer (a.k.a. Crab Mallet)
Crab hammers (frequently also called crab mallets) may be the
best hammer style of all in terms of seafood preparation. Usually
they are rather small. The round or square head commonly measures
about two to three inches wide and the combined length of the
tool amounts to approximately seven or eight inches. Besides
operating these little hammers with the handle, some designs
also allow using the head as an excellent grip, thus turning
their special handle into an additional tool.
The functionality of these little hammers
is certainly not limited to just crabs. Besides other types of
shellfish, they can prove to be a rather handy kitchen tool when
preparing quite a number of other foods.
Crab hammers can be made of a pewter alloy
(like the famed Wilton crab hammers), all hardwood, stainless
steel, or some combination of hardwood and metal. Pewter never
rusts. However, it is considerably softer than steel, even as
an alloy. Hence, the pewter handle should never be used as a
prying tool, as it may bend. Wooden crab hammers also work well.
They are comparatively inexpensive. Much like the wood of cutting
boards, they may expand and contract and ultimately crack if
left uncared for in a moist state. Since wood is porous, it can
also harbor bacteria and attract mildew. Hence, wooden crab hammers,
right along with wooden cutting boards, should be cleaned properly
after use with a light water/bleach solution (2 parts water and
1 part bleach) and dried. Some of the wooden designs also feature
a convenient hatchet like edge on one side (similar to the straight-peen
hammer pictured further up in this text). The handles are round
and functionally serve no purpose other than what is expected
of any typical hammer handle. 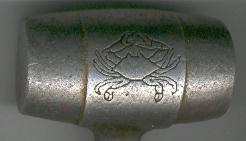
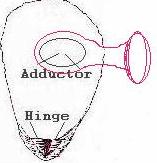
Most metal crab hammer designs work particularly
well on oysters. Besides using the head in a chipping or cracking
manner to create an opening along the edge of the oyster's bill,
it can then switch to being the handle of an effective blade.
This "blade handle" can then be inserted in the opening
to cut the adductor muscle within the oyster.
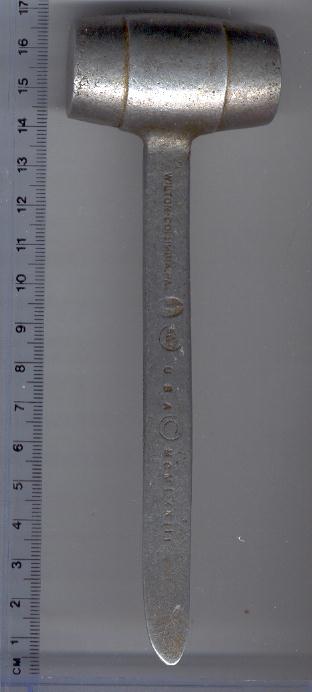
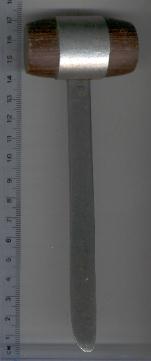 Image left: An older crab hammer with a pewter
sleeved hardwood head and a stainless steel handle. It was made
in Japan (perhaps in the 1960s or 70s) without a manufacturer's
name. It has a crab imprint which is identical to the one used
in the Wilton pewter crab hammers (pictured above). Although
the shape and size of this crab hammer is almost identical to
the commonly found American pewter hammers, it is considerably
different. The head is made of some type of hardwood which is
sleeved by a pewter band. The "handle blade" is made
of fairly thick stainless steel with tapers down to a rather
dull, flat and rounded tip. Aside from being rather attractive
looking, it is also one tough tool - much like an oyster knife
with a "T" handle. A large oyster can be billed and
shucked within seconds with this particular fellow - without
ever using the hammer head. I don't bill oysters with the handles
of pewter crab hammers. Pictured ruler measures in centimeters.
Hammer length 17 cm or 6 3/4". Head width 5.8 cm or ~ 2
1/4". Head diameter at ends 2.6 cm or ~ 1". Weight
5 oz. Dimensionally, the famous pewter Wilton hammer is quite
similar. The older one I have has a length of 16.5 cm or ~ 6
1/2". Head width is 5.5 cm or ~ 2 1/4". Head diameter
at ends 2.6 cm or ~ 1". Image of an older Wilton can be
viewed by clicking here.
Image left: An older crab hammer with a pewter
sleeved hardwood head and a stainless steel handle. It was made
in Japan (perhaps in the 1960s or 70s) without a manufacturer's
name. It has a crab imprint which is identical to the one used
in the Wilton pewter crab hammers (pictured above). Although
the shape and size of this crab hammer is almost identical to
the commonly found American pewter hammers, it is considerably
different. The head is made of some type of hardwood which is
sleeved by a pewter band. The "handle blade" is made
of fairly thick stainless steel with tapers down to a rather
dull, flat and rounded tip. Aside from being rather attractive
looking, it is also one tough tool - much like an oyster knife
with a "T" handle. A large oyster can be billed and
shucked within seconds with this particular fellow - without
ever using the hammer head. I don't bill oysters with the handles
of pewter crab hammers. Pictured ruler measures in centimeters.
Hammer length 17 cm or 6 3/4". Head width 5.8 cm or ~ 2
1/4". Head diameter at ends 2.6 cm or ~ 1". Weight
5 oz. Dimensionally, the famous pewter Wilton hammer is quite
similar. The older one I have has a length of 16.5 cm or ~ 6
1/2". Head width is 5.5 cm or ~ 2 1/4". Head diameter
at ends 2.6 cm or ~ 1". Image of an older Wilton can be
viewed by clicking here.
* Other Hammers
 Culling Hammers
Culling hammers are not used to open oysters. On the contrary:
They are precision tools used in a process called culling, the
skillful and delicate work associated with separating individual
oysters from oyster clumps. More on culling hammers in the commercial opening
section.
Crack Hammers
Small, all carbon steel hammers called crack hammers were once
used in some commercial shucking houses to knock off a piece
of the front of the oyster (the so called bill) to more easily
gain access to meat inside with an oyster knife. Frequently a
special "cracking block" or "oyster shoe"
held the oyster in place. A so called crack knife was
also used in this process (pictured under knives).
Crack knives are heavy. They were machined out of a piece flat
carbon steel bar stock (usually about 8" long). The handle
ends of these knives, where the crack hammers impact, are the
flat ends of the original steel bar stock (usually ½"
x ¾"). Today, the commercial use of crack knives
for opening oysters is considered an occupational safety hazard.
 *
Pliers
*
Pliers
The use of a pair of pliers to open an oyster is also recommended
by some folks. Unlike the "hammer method" which addresses
the side margin of the "bill" in the government booklet
mentioned above, the pliers are applied to the front of the bill.
An attempt is made to snap off a chunk of the upper and lower
shell halves and create an opening where a knife can then be
inserted to cut the adductor muscle inside. Although it does
work, it can be a real pain in the "you know what"
on large oysters. Since oyster shells, particularly large ones,
are remarkably tough, it is best to "nibble away" pieces
until a sufficiently large hole  for the knife blade is evident. Essentially,
the "pliers method" is a clumsy variant of the commercial method,
as the commercial method also aims to remove a shell chunk from
the front of the bill - with an oyster knife of course, not a
pair of pliers.
for the knife blade is evident. Essentially,
the "pliers method" is a clumsy variant of the commercial method,
as the commercial method also aims to remove a shell chunk from
the front of the bill - with an oyster knife of course, not a
pair of pliers.
"Better" Mouse Traps
"Automatic" Lever Action
Devices
A review of clumsy oyster opening methods would not be complete
without mentioning the "automatic" lever action oyster
openers. To the best of my knowledge, various models of these
devices started popping up in the market place in the 1970s,
probably right about the time Dan Aykroyd presented the truly
amazing "Bass-O-Matic" on the Saturday Night Live TV
show.
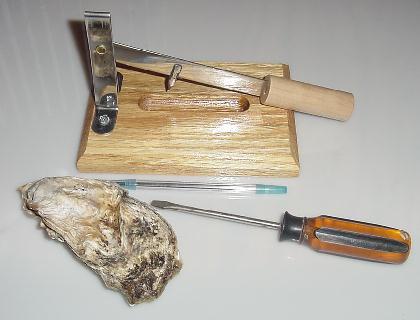
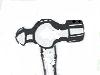
The device pictured is called a "Safety
Action Oyster Opener". Not included: The pen, merely for
size reference, the screw driver (we'll get to that), and the
victim (a medium Pacific oyster). It features a varnished wooden
base measuring 5 x 7". A groove, approximately 3 ¾"
long, 1" wide, and ¼" deep was hollowed out
lengthwise. An upside down V shaped bracket (about 3 ¾"
tall, stainless) in the forward section, mounted on the wood
with two ¼ hex head screws, serves as the hinging sector
for a flat stainless bar with a round wooden handle on the end.
The bar is about 1/32" (1mm) thick and approx ¾"
tall (handle part 1 ¼ x 3"). The bar and handle measure
about 8 ½" long and hinge on what appears to be a
brass alloy rivet at about the 2 ½" mark on the upside
down V bracket. A strong steel pin with a point, about ¾"
long is welded to the rather thin bar, on the underside and perpendicular,
just short the half-way point between the bracket and the beginning
of the handle. With the bar held up to where it is positioned
horizontally and parallel to the base, the point of the pin aims
at the hollowed out groove below at the beginning of the forward
1/3 of the groove. This is where the oyster will be pierced by
the point of the pin, hopefully right between the shell halves
while it is held down on its edge in that wooden groove. The
entire nifty device comes in a 9 ½ x 5 x 5" box and
includes an interesting piece of paper titled "Directions
for use".
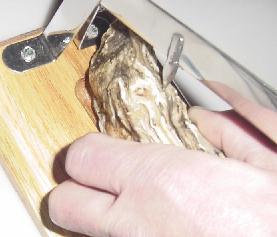 Action!
The "automatic" oyster opener immediately charmed me
with its obvious mechanical simplicity and I was most anxious
to put it to work. Although I suspected the use of it to command
little more intelligence than required to operate a conventional
paper cutter, I decided not to fall victim to the old adage "when
all else fails, read the instructions". I'm glad I did.
I was instructed to position the oyster on the base in that groove
and to bring that point down on "any of the three sides
away from the hinge end… It is important at this stage to
probe these three sides for the true dividing line between the
shell halves. Nature has provided the oyster with a series of
apparent edges or dividing lines, only one of which is the true
one. Practice makes perfect." Hence it did not matter
if that point pierced the shell divide on the side of the adductor
muscle, on the bill, or the side away from the adductor. I was
then advised to apply firm downward pressure on the handle with
the opener point placed at the "most likely line"
between the shell halves. Either the oyster would then open rather
easily or I would have to try again until I find it. Bottom line:
That part does work and the pin indeed pries open a gap between
the shells. Now what? The adductor muscle of the oyster is still
hanging on for dear life and the hinge has not relented. Another
look at the instructions furnishes the answer: "As soon
as the two shell halves start to separate or shift sideways under
pressure from the opener, insert a common screwdriver into the
opening and with a twist of the wrist(,) hinge will break and
oyster will be open." The oyster essentially ends up
being ripped apart by the shell halves - not elegant by any stretch
of the imagination and certainly not very automatic. Despite
appreciating the irony at hand, I didn't really like being asked
to go out and look in my dirty old toolbox for a "common
screwdriver". I thought the screwdriver days of opening
oysters were over. This new "thing" was supposed to
open the oyster. I don't need that "thing" because
I already know that my flathead screwdriver alone will open any
oyster via the hinge. Needless to say, I will try to resell this
device at my earliest convenience as "only used once".
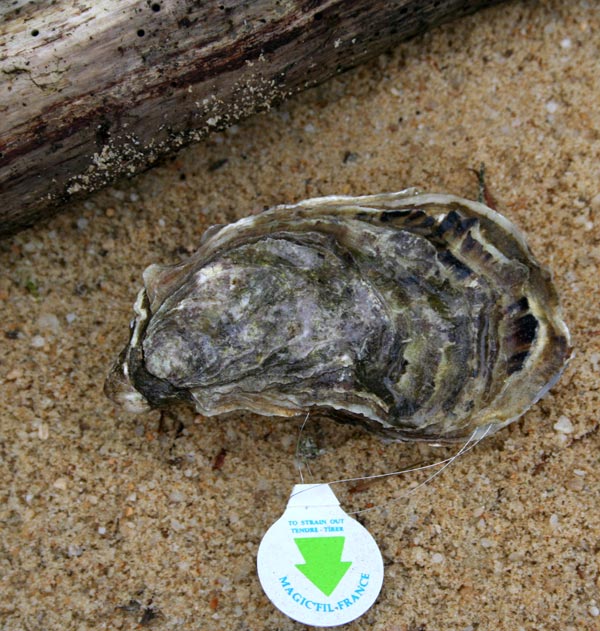
 Pull Tab Oysters
A couple of years ago I ran across a European news blurb advising
of a new way to open oysters. Some enterprising guy had figured
out a way to insert a thin piece of stainless steel or nylon
wire between the shell halves of a living oyster, then somehow
loop it around the adductor muscle and then feed it back out
of the oyster. The ends were then tied into (or attached to)
a loop or pull. Lots of fresh oysters with convenient little
rip chords hanging out of their shells could then be offered
to the public. The design is somewhat reminiscent of pull tabs
on soda pop cans or a garrote of some sort. All the consumer
needs to do is yank on that loop which then cuts the soft adductor
muscle inside the oyster and - voilà! - it's open. Oyster
knives would be rendered obsolete. Well, actually not quite obsolete
as the rip chord would certainly sever the adductor muscle, yet
leave at least one substantial portion of the cut adductor muscle
firmly attached to the shell. Hence it would first need to be
cut from the shell before the oyster would be ready for slurping.
I'm not sure if the idea ever caught on. I suspect it did not.
Update (Jan. 12, 2008): Looks like the
oyster pull tab idea is still alive in France. Picture of one
of these "pull tab" oysters: http://www.dzigue.com/images/magic-huitre.jpg
French website describing this "oyster magic":
http://www.magic-huitres.fr/catalog/

